This post continues my blog series “Building a Telco Test Lab Using srsRAN”. So far, I covered CPU isolation, TuneD, DPDK, and NIC optimization. Now it’s time to look at one of the most important parts of a ORAN deployment: Synchronisation.
In this chapter I’ll walk through the basics of PTP for telco, the G.8275.1 profile, and the two deployment models: LLS-C1 and LLS-C3. I’ll also cover how to configure ptp4l, phc2sys, and ts2phc using LinuxPTP, and share some example configuration files you can use in your own setups.
PTP Profiles for Telco (G.8275.x)
There are multiple PTP profiles in telecom networks, but the two most relevant ones for ORAN deployments are:
- G.8275.1 (Multicast)
Full timing support across the whole network, L2 multicast, best performance.
- G.8275.2 (Unicast)
Used if not all network elements (switches, routers) support multicast.
In this post I focus on G.8275.1 multicast.
LLS-C1 and LLS-C3 Deployment Models
PTP can be deployed in different ways depending on where your Grandmaster (GM) is located in the network. The two most common options in private ORAN deployments are:
LLS-C1
- DU acts as the PTP Grandmaster or BC for the RU
- Typically used for:
- Labs and PoCs
- Demo setups
- Rural or standalone deployments
LLS-C3
- DU and RU sync from an external PTP GM
- Usually used in:
- Setups involving multiple sectors
- Distributed deployments
There are other variants like LLS-C2 or LLS-C4, but I won’t cover them here because these two deployments are most common in test labs. Have a look at this blog post for more info on Timing & Synchronization in ORAN.
NTP and Other Sync Sources
The Network Time Protocol is usually enabled on most Linux distros by default. We have to disable it because it would otherwise mess with our internal system clock which we already sync using PTP. To avoid NTP and phc2sys fighting for control over the system clock I disable NTP right away. The default NTP daemons vary based on the operating system you are using.
On Ubuntu 24.04 disable NTP like this:
sudo timedatectl set-ntp false
sudo systemctl disable --now systemd-timesyncd
sudo systemctl disable --now ntpsec
LinuxPTP Overview
LinuxPTP is the implementation of IEEE 1588 used in Linux. I usually use the following main tools. For this blog post I am using Linuxptp version 4.4 built from source. You can find all necessary information on the official LinuxPTP GitHub repo.
ptp4l
Runs the actual PTP state machine. This handles announce, sync, delay-req, and GM selection logic.
phc2sys
Synchronises the system clock to a NIC’s PTP hardware clock (PHC).
ts2phc
Converts a PPS signal into a PHC time reference. Used in LLS-C1 setups where the DU has a GNSS receiver.
pmc
Command-line client for querying a running ptp4l instance.
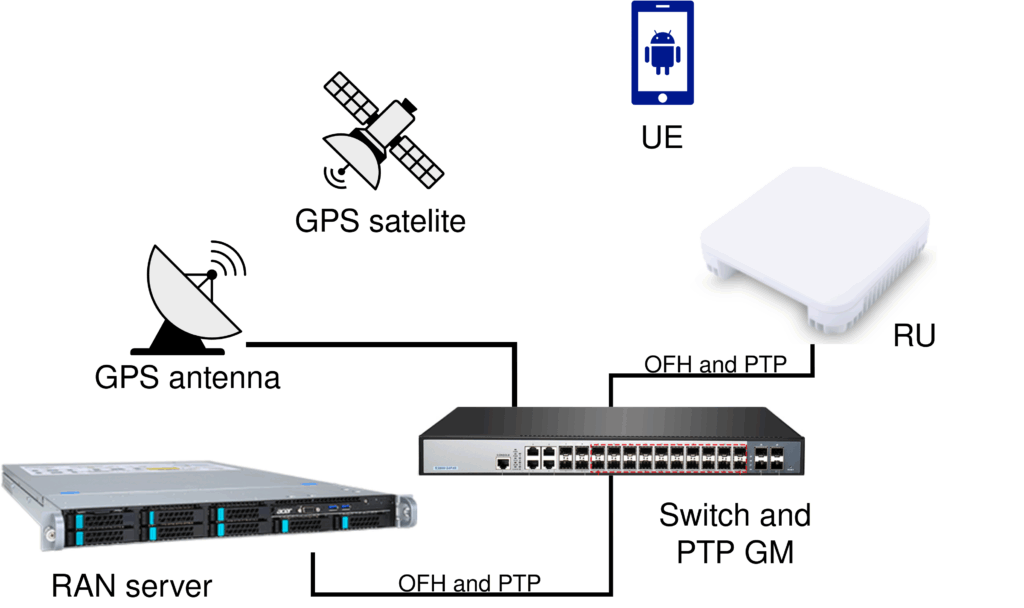
LLS-C3 Setup (PTP GM connected to DU/RU)
LLS-C3 is the PTP deployment method I see deployed the most. Usually there is a switch SFP+ in between the DU(s) and RU(s) which acts as PTP GM.
ptp4l and phc2sys
These are the default Linuxptp config parameters for G.8275.1.
[global]
dataset_comparison                 G.8275.x
G.8275.defaultDS.localPriority     128
maxStepsRemoved                    255
logAnnounceInterval                -3
logSyncInterval                    -4
logMinDelayReqInterval             -4
delay_request_variability          0.3
serverOnly                         0
G.8275.portDS.localPriority        128
ptp_dst_mac                        01:80:C2:00:00:0E
network_transport                  L2
domainNumber                       24
Meaning of the parameters
- maxStepsRemoved
Defines how many network hops a Sync message is allowed to take before the message is discarded. - logAnnounceInterval / logSyncInterval / logMinDelayReqInterval
Configure how frequently the node sends Announce, Sync, and Delay_Req messages. - delay_request_variability
Adjusts how ptp4l filters variations in delay measurements. - serverOnly
Controls whether this node is allowed to become a slave. - G.8275.portDS.localPriority
Sets port-level priority used during BMCA. - ptp_dst_mac
Defines the multicast MAC address used for PTP traffic. - network_transport
Specifies whether PTP is transported over L2 or L3 packets. - domainNumber
Identifies the PTP domain. Only nodes using the same domain participate in the same timing topology.
Configs
For the LLS-C3 you can usually use the default Linuxptp config for G.8275.1 available on the official GitHub repo of Linuxptp as well as here.
How to run it?
Run ptp4l and phc2sys like this:
ptp4l -i enp81s0f0np0 -f ./G.8275.1-lls-c3.conf -m
phc2sys -s enp81s0f0np0 -c CLOCK_REALTIME -w -m -u 1 -f ./G.8275.1-lls-c3.conf
LLS-C1 Setup (DU acts as GM with GNSS sync)
Another common deployment configuration is LLS-C1. This setup is especially useful for remote environments without access to a proper network infrastructure. It also works very well in lab scenarios where a dedicated PTP Grandmaster is outside the budget.
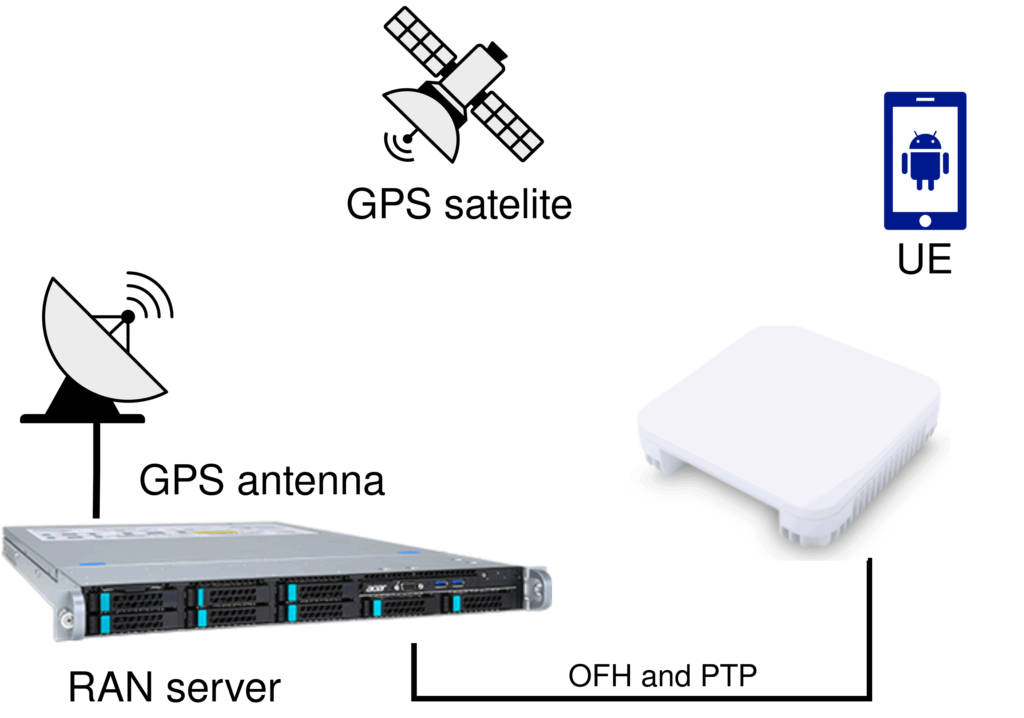
ts2phc
For LLS-C1 with GNSS sync I use ts2phc to synchronise the NIC’s PHC to GNSS. Other than ptp4l and phc2sys, ts2phc needs other config files. It requires a so-called leap seconds file. Leap seconds are periodic one-second adjustments to Coordinated Universal Time (UTC) to keep the system’s time close to mean solar time.
This file needs to be updated every year. One source where those files are published is: https://hpiers.obspm.fr/iers/bul/bulc/ntp/
My ts2phc config:
[global]
use_syslog 0
verbose 1
logging_level 7
ts2phc.pulsewidth 100000000
ts2phc.nmea_serialport /dev/gnss0
leapfile /etc/leapseconds/leapseconds.list
[enp81s0f0np0]
ts2phc.extts_polarity rising
Meaning of the ts2phc parameters
- logging_level
Controls how much detail ts2phc prints. - ts2phc.pulsewidth
Defines how long a PPS pulse is considered valid. - ts2phc.nmea_serialport
Specifies the GNSS sink. - leapfile
Path to the leap-second list. - ts2phc.extts_polarity
Sets the expected PPS polarity.
Make sure to change enp81s0f0np0 for your interface name!
ptp4l
In this scenario the DU server is the PTP GM. To achieve this using ptp4l I set the following option in the config:
serverOnly 1Setting serverOnly to 1 forces ptp4l to transmit PTP messages (instead of receiving them) and operate as the PTP GM.
Configs
How to run it?
Before running ts2phc I check if the GNSS receiver of the NIC is actually receiving something and is able to lock.
sudo cat /dev/gnssThis will show if the GNSS receiver has locked GPS. The output is specified in NMEA 0183. For more information on how to read the output have a look here.
Once GPS is locked you can run ts2phc.
sudo ts2phc -c enp81s0f0np0 -s nmea -m -f ./ts2phc.confOnce ts2phc is running I start ptp4l and phc2sys as I did earlier:
sudo ptp4l -i enp81s0f0np0 -f ./G.8275.1-lls-c1.conf -m
sudo phc2sys -s enp81s0f0np0 -c CLOCK_REALTIME -w -m -u 1 -f ./G.8275.1-lls-c1.conf
LLS-C1 Setup (DU acts as GM without GNSS)
The last configuration I want to present is LLS-C1 without GPS sync.
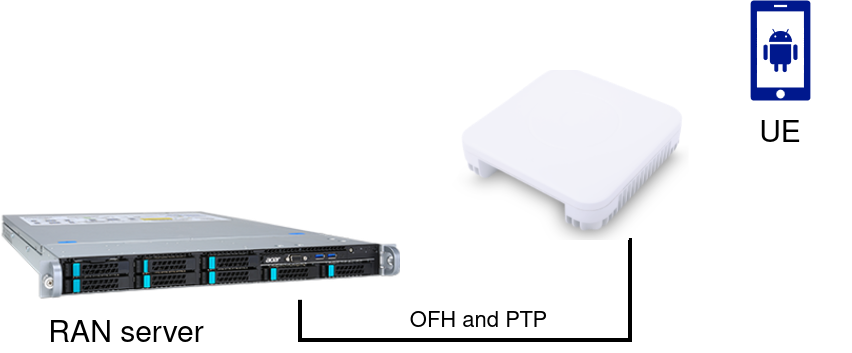
A PTP GM without GNSS or any external synchronization source will definitely drift, the question is how fast. If the drift gets too high, DU and RU will fall out of sync. To avoid this, you’d normally need expensive and clunky equipment.
But there is a neat solution! The E810-XXVDA4T with its onboard GNSS receiver provides a surprisingly stable clock for running a PTP GM without external sync! It’s the only NIC I’ve encountered that can operate as a GM with low enough drift to satisfy ORAN requirements. This setup is particularly useful for demos or lab setups where GNSS simply isn’t accessible. It’s also cheaper than every off-the-shelf PTP GM.
Some RUs reject PTP GMs that are not synced to any external source. To make RUs accept a GM even when no external sync is available, I override two parameters in the ptp4l config:
- clockAccuracy
Indicates the PTP GM sync source. Set to 0x20 for GNSS to make clients believe the GM is GNSS synced. - clockClass
Sets the priority of the clock. Set to 6 for highest priority for our GM.
serverOnly as before:
serverOnly 1
clockAccuracy 0x20
clockClass 6
Configs
How to run it?
Run ptp4l and phc2sys as before:
sudo ptp4l -i enp81s0f0np0 -f ./G.8275.1-lls-c1-no-gnss.conf -m
sudo phc2sys -s enp81s0f0np0 -c CLOCK_REALTIME -w -m -u 1 -f ./G.8275.1-lls-c1-no-gnss.conf
Validation
For ORAN Split 7.2 deployments I always recommend aiming for switches with Class C PTP accuracy. In general, network components are considered Class C PTP when they can maintain a sub-10 ns time error, as defined in ITU standards like ITU-T G.8273.2.
My rule of thumb:
- RMS variations should not exceed 8 ns
- The absolute offset should stay around ±5
- For phc2sys, I expect RMS variations to stay within ±100
Both ptp4l and phc2sys need time to settle. Sometimes it takes several minutes. If both are still not stable after about 10 minutes, something is wrong.
It’s possible that a RAN may still operate with RMS values of 10 ns or higher, but from my own experience, you won’t get 100 percent reliability.
Creating Systemd Services
Once PTP is considered stable I usually set up all daemons as systemd services. This saves me time because I don’t have to restart the Linuxptp daemons after every reboot. I wrote this small script to deploy all 3 applications.
Logs:
journalctl -u ptp4l.service -f
journalctl -u phc2sys.service -f
journalctl -u ts2phc.service -f
Summary
This post covered the basics of how I deploy PTP for telco using LinuxPTP. If this sparked your interest, the Red Hat OpenShift documentation has a detailed Chapter on PTP.
And yes, I know how this usually goes: you’ve probably tried the exact steps I described, and something still doesn’t work. PTP infrastructure is very sensitive and prone to errors. In an upcoming blog series, I’ll dive deeper into debugging PTP and common failure scenarios. Stay tuned!