In this post, I focus on setting up the Sylva management cluster as the foundation for the rest of the series.
The goal is not just to deploy the cluster, but to understand how the bootstrap process works and how the different components come together. I walk through the steps required to bring up a management cluster in a small lab environment, including the required infrastructure and configuration.
This serves as the starting point for everything that follows, since the management cluster provisions and operates the workload cluster in the next steps.
Lab Setup
This is a test lab setup, not a production deployment. The goal is to keep the infrastructure requirements within what a typical test lab can provide.
The lab consists of:
- one bootstrap VM
- one management VM running libvirt and sushy-tools
- one control-plane VM provisioned via CAPM3
- one physical server (used later as workload cluster)
I am using a CAPM3-based deployment here. CAPD would be a lighter alternative, but I have not tested it yet. The official minimum requirements for CAPM3 are 128Gi disk and 64Gi memory. In this setup I was able to run it with less.
Topology
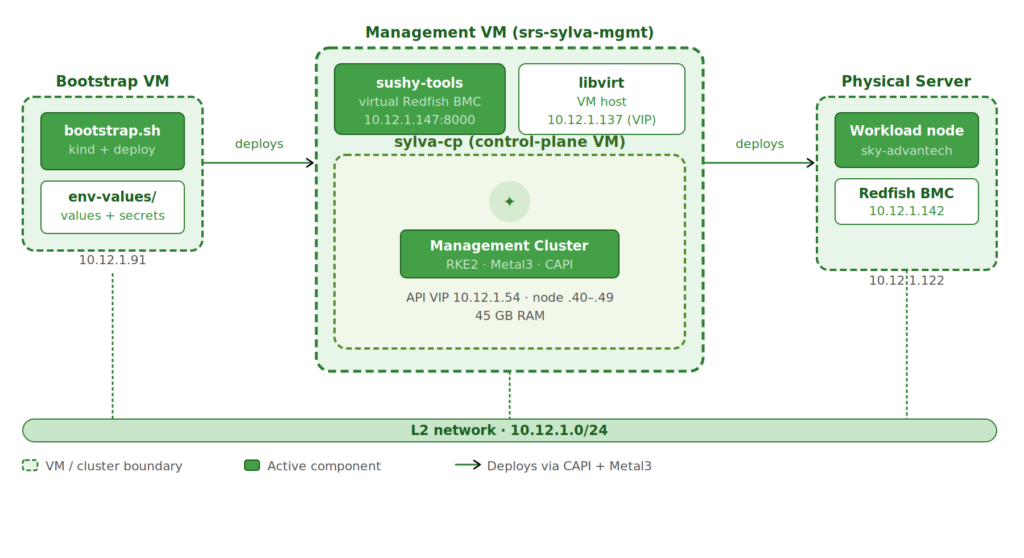
The bootstrap VM is called srs-sylva-bootstrap and runs the Sylva bootstrap tooling. This VM needs around 80GB for the deployment process.
For the management cluster I chose to use a VM in Proxmox which I call srs-sylva-mgmt. The control-plane VM created for the Sylva management cluster is called sylva-cp.
I had to assign quite a lot of RAM to the sylva-cp VM. The default installation includes many memory-hungry components and also requires storage for downloaded container images. The Sylva documentation recommends 64GB RAM, but I was able to run it with 45GB. This is likely not sufficient for stable operation but sufficient for this deployment.
For the workload cluster I will use an telco server from Advantech which supports a Redfish BMC.
A setup like this allows testing the full CAPM3 provisioning flow without requiring multiple physical servers. For an operational network, you should stick to the recommended minimum requirements.
The following table shows the IP addresses used in this setup.
| Name | IP Address | Used By | Purpose |
|---|---|---|---|
| sylva-bootstrap | 10.12.1.91 | Bootstrap VM | Runs bootstrap (kind + deploy) |
| sylva-mgmt-bmc | 10.12.1.147 | Management VM | Redfish BMC (sushy) |
| sylva-mgmt-vip | 10.12.1.137 | Management Cluster | Cluster VIP (optional) |
| cluster_virtual_ip | 10.12.1.54 | Management Cluster | K8s API endpoint |
| sylva-cp | 10.12.1.40–49 | Control-plane VM | DHCP during provisioning |
| sky-advantech | 10.12.1.122 | Physical Server | Workload node |
| advantech-bmc | 10.12.1.142 | Advantech BMC | Redfish endpoint |
| Gateway | 10.12.1.1 | Network | Default gateway |
For a more detailed explanation of Sylva workflow and other possible configurations have a look at the Sylva docs.
Bootstrap VM
The bootstrap VM runs the Sylva bootstrap tooling and is used for the deployment of the Sylva management and workload clusters. During the installation process, Docker images are downloaded which require disk space. I will refer to it as sylva-bootstrap.
Requirements
- any Linux VM with Docker
- at least 80GB disk
Install dependencies
I used Ubuntu 22.04 Server for the bootstrap VM.
apt-get update
apt -y install ca-certificates gnupg lsb-release docker.io yamllint binutils git
If you are not using root, you can add your user to the Docker group to avoid requiring sudo when running Docker.
usermod -aG docker $USER
systemctl enable --now docker
After adding the user to the Docker group, log out and back in (or start a new shell) to apply the changes.
Management VM
The management VM acts as the libvirt host for the control-plane VM and exposes a virtual Redfish BMC using sushy-tools. This is necessary to provide Sylva with a BMC endpoint for the management cluster node.
Requirements
- RAM: at least 48GB (≈45GB for the control-plane VM)
- CPU: at least 10 cores (8 assigned to the VM)
- Disk: at least 80GB (≈60GB for the VM disk)
The default Sylva deployment sets up many units, and some of them are memory-hungry. 45GB was just enough to get all units deployed. In this post I use the default settings, but in a later post I will review the Sylva units and configure them.
The installation also requires around 60GB of storage for the sylva-cp VM to store all required Docker images.
Create Environment Config
In this chapter, I show how I configured the Sylva environment. The examples use the IP addresses from my setup, so make sure to replace them with values that match your environment. For more details, refer to the official Sylva documentation.
Prepare sylva-core Repo
As a first step, I clone the sylva-core repo on the bootstrap VM:
git clone https://gitlab.com/sylva-projects/sylva-core.git
cd sylva-core
All cluster-specific configuration lives under environment-values/.
I use two environments:
- one for the management cluster
- one for the workload cluster
The workflow is always the same: select the correct folder, adjust values.yaml and secrets.yaml, and then run the corresponding deployment script.
In the following I will explani the configuration of the management cluster deployment.
Cluster Configuration
This section defines the cluster-level settings and providers used for provisioning.
cluster_virtual_ip: 10.12.1.54

cluster:
  capi_providers:
    infra_provider: capm3
    bootstrap_provider: cabpr

control_plane_replicas: 1
In my setup:
cluster_virtual_ipdefines the virtual IP of the Kubernetes APIinfra_provider: capm3configures Metal3 as the infrastructure providerbootstrap_provider: cabpruses RKE2 for bootstrapping the nodescontrol_plane_replicasis set to 1 since this is a single-node setup
The virtual IP must be reachable within the same network as the nodes and is used to access the cluster API once the control-plane is up.
BareMetalHost Configuration
The first step is defining the control-plane node as a BareMetalHost. In this setup, that is the sylva-cp VM running on the management host and exposed through sushy-tools as a virtual Redfish BMC.
baremetal_hosts:
  sylva-cp:
    bmh_metadata:
      labels:
        cluster-role: control-plane
    bmh_spec:
      description: control-plane node (VM on sylva-mgmt)
      bmc:
        address: redfish-virtualmedia+http://10.12.1.147:8000/redfish/v1/Systems/11111111-2222-3333-4444-555555555555
        disableCertificateVerification: true
      bootMACAddress: 52:54:00:ab:cd:ef
      bootMode: legacy
      rootDeviceHints:
        deviceName: /dev/vda
    interface_mappings:
      enp1s0:
        mac_address: 52:54:00:ab:cd:ef
The important parts here:
- the BMC address points to the sushy-tools endpoint on the management VM
- the boot MAC must match the one defined when creating the VM with
virt-install - the root device is
/dev/vda, since the VM uses a single disk control_plane_replicasis set to 1 for this setup
This is where the virtual control-plane node is connected to Metal3. From here on, it is treated like a regular bare-metal machine and provisioned via Redfish. RKE2 User Configuration
Next, I configure the initial user for the node using additionalUserData.
This is passed as cloud-init user data and applied during provisioning.
rke2:
  additionalUserData:
    config:
      #cloud-config
      users:
        - name: sylva-user
          groups: users,sylva-ops
          sudo: ALL=(ALL) NOPASSWD:ALL
          shell: /bin/bash
          lock_passwd: false
          passwd: "<generated-password-hash>"
          ssh_authorized_keys:
            - <your-ssh-public-key>
This creates a user on the node during provisioning:
sylva-useris added with passwordless sudo- SSH access is enabled using your public key
- the password must be provided as a hashed value
To generate the password hash, use:
openssl passwd -6 "your-password"
Replace:
<generated-password-hash>with the output of the command<your-ssh-public-key>with your own public key
This allows access to the node immediately after provisioning without additional manual setup.
CAPM3 Network Configuration
This section defines the OS image and the provisioning network used by CAPM3.
capm3:
  os_image_selector:
    os: ubuntu
    hardened: true
  networks:
    primary:
      subnet: 10.12.1.0/24
      gateway: 10.12.1.1
      start: 10.12.1.40
      end: 10.12.1.49
  dns_servers:
    - 1.2.3.4
    - 8.8.8.8
In my setup:
- the OS image is Ubuntu with the hardened profile enabled
- the provisioning network is part of the same L2 network as the lab
- IPs are assigned from a small DHCP range (
.40 - .49) - DNS servers are defined explicitly
The important part here is that the control-plane node receives its IP from this range during provisioning, which must match the network configured on the management VM.
Control-Plane Network Mapping
This section binds the control-plane configuration to the BareMetalHost and defines which interface is used.
control_plane:
  capm3:
    hostSelector:
      matchLabels:
        cluster-role: control-plane
    networks:
      primary:
        interface: enp2s0

network_interfaces:
    enp2s0:
      type: phy
In my setup:
- the
hostSelectormatches the label defined earlier on the BareMetalHost - this ensures the
sylva-cpnode is used as the control-plane interface: enp2s0defines which interface is used for the primary network- the interface is declared as phy since it is exposed to the VM as a physical interface
The interface name must match what is present inside the node, otherwise provisioning will fail.
BareMetalHost Defaults
This section defines default settings applied to all BareMetalHosts unless overridden.
baremetal_host_default:
  bmh_spec:
    externallyProvisioned: false
    bmc:
      disableCertificateVerification: true
    bootMode: UEFI
    rootDeviceHints:
      deviceName: /dev/nvme0n1
In my setup:
externallyProvisioned: falseensures the node is provisioned by Metal3- certificate verification for the BMC is disabled
- the default boot mode is set to UEFI
- the default root device is
/dev/nvme0n1
These defaults are overridden in the control-plane definition, where a different disk and boot mode are used.
Storage and Global Settings
This section configures storage, bootstrap access, and some global settings.
units:
  longhorn:
    enabled: false
  local-path-provisioner:
    enabled: true

metal3:
  bootstrap_ip: 10.12.1.91

proxies:
  http_proxy: ""
  https_proxy: ""
  no_proxy: ""

ntp:
  enabled: false
In my setup:
- Longhorn is disabled and replaced with
local-path-provisioner - this is the simpler option for a VM-based single-node management cluster
bootstrap_ippoints to the bootstrap VM- proxy settings are empty since the lab has direct internet access
- NTP is disabled
Using local-path-provisioner avoids the overhead of a distributed storage system, which is not needed for this setup.
Example of the above discussed configuration: sylva-rke2-capm3.zip
Deployment
After the environment is configured, I deploy the management cluster. The sylva-cp VM must be running at this point.
cd sylva-core
./bootstrap.sh environment-values/ocudu-rke2-capm3
The bootstrap completes in two phases:
- Bootstrap cluster (kind): deploys Metal3, CAPI, provisions the VM, and waits for RKE2 to come up
- Pivot: moves all controllers to the management cluster
The kind cluster is no longer needed after this.
This process can take quite some time depending on hardware and internet speed. For me it took around 40 minutes.
Once provisioning is complete, connect to the sylva-cp VM and verify:
kubectl get nodes
kubectl get pods -A
Next Step
In the next post, I will deploy the workload cluster on a telco grade server and prepare it for running RAN workloads.
[…] post was initially published here by Nils Fuerste and is reposted here with […]